Building Your Fist Web Page
Now that you have a solid knowledge of HTML elements and attributes we are ready to put them all together to make a basic web page. As we move through this lesson I am going to introduce some new tags along the way.
There is no right or wrong way to lay out a web page. It is really up to you to decide where you want your elements to go. The example we will be using covers a lot of different elements and give you the basic knowledge you need to make different variations.
Anatomy of a web page
All HTML web pages are made up of a collection of elements that structure the content into a page.
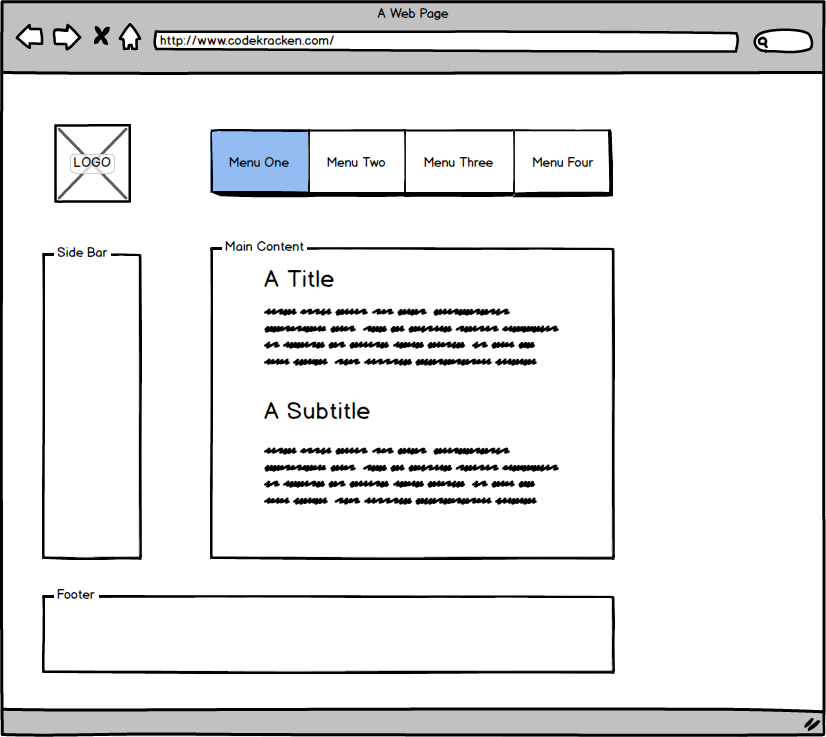
In the above example you can see that we have a logo, a navigation menu, a sidebar, the main content and a footer. These are all pretty basic and with the exception of the sidebar you would see these elements on just about any web page on the internet. Sidebars are becoming less common but still have there place and can be very useful at times.
The logo and navigation menu are going to be contained in an element called “header” as these items are in the header section of the document. Remember not confuse the header element with the head element.
How the code looks
Take a look at how the code is written:
<!DOCTYPE html>
<html lang="en">
<head>
    <meta charset="UTF-8">
    <title>A web page</title>
</head>
<body>
<div class="container-fluid">
    <header>
        <img src="/img/logo.png" alt="logo">
        <nav>
            <ul>
                <li><a href="/page1.html/">Menu One</a></li>
                <li><a href="/page2.html/">Menu Two</a></li>
                <li><a href="/page3.html/">Menu Three</a></li>
                <li><a href="/page4.html/">Menu Four</a></li>
             </ul>
          </nav>
    </header>
<div class="container">
    <div class="row">
        <div class="col-md-4">
            <aside id="side-bar">
            </aside>
         </div><!-- .col-md-4 -->
     <div class="row">
        <div class="col-md-8">
             <article>
                  <h1>A Title</h1>
                  <p>Lorem ipsum dolor sit amet, consectetur adipisicing elit.
                  Id placeat harum neque, odio minima optio itaque
                  illo aliquid labore delectus quis ipsam aspernatur earum
                  quod, voluptatum consequuntur tempore qui, animi.</p>
                  <h2>A Subtitle</h2>
                  <p>Lorem ipsum dolor sit amet, consectetur adipisicing elit.
                  Facere sint ducimus fugiat fuga sed ea harum aspernatur
                  dicta sequi, adipisci reiciendis architecto enim doloremque
                  eum repudiandae natus unde saepe officia.</p>
             </article>
        </div><!-- .col-md-8 -->
      </div><!-- row -->
    </div>
    <footer>

    </footer>
</body>
</html>
Declare the doctype
We begin by telling the browser that we are using HTML 5 by setting our doctype on the first line.
Next we specify the language (spoken language not coding language) of the page by assigning an attribute to the html tag on line two.
<html lang="en">
The attribute value “en” tells the browser and search engines that the language we are speaking on the page is english. You could leave this tag out but it is considered best practice to include it. To read a full list of languages that you can set check out W3Schools full list of language attributes.
Define a character set
Inside the head element you we have a “meta” tag with an attribute “charset=UTF-8”. Charset or character set, helps browsers display the web page correctly. For a more detailed explanation of character sets take a look at W3Schools HTML charset page.
Div Elements
After our title tag we have the closing head element then the opening body tag. Then we have a tag that we have not introduced you to yet, the div tag. The div tag is a very generic html element and can be used for just about anything that you would want. It is a good idea to use the div tag only when there is no other tag available to accomplish what you are trying to do. For example; before html5 there was no nav tag (an element used to add navigation to a web page) so developers would use a div tag. Likewise if you had a blog post you would use a div tag until html5 introduced the article element.
Classes and Id’s
We use the div tag several times throughout our code. This would make it very difficult to style our page later on when start to learn CSS3. To help us separate the different div tags on the page we can assign attributes to each div element. By assigning a “class” or “id” to our markup, we make it easier to target the elements when we start applying our styles. We will cover classes and id’s in more detail later on.
Header
Our header element contains two essential elements. A logo for our website and a navigation menu. We want our header to display on every web page that we have and we want it to look the same on every page. To accomplish this we would simply copy the header code and everything inside of it and paste it into our second page. Later on, in more advanced tutorials, I will show you how to make it once and display on several pages by using a scripting language.
Navigation
Just about every website or web page has or at least needs a navigation menu. These help users move around to different sections or pages and without them it would be almost impossible to get to different pages of a website. To build a navigation menu we have a handy tag called “nav”, nested within our nav tag is an unordered list which contains links.
List of links
A website’s navigation menu is simply a list of links. To create a list we have two options, ordered and unordered. An ordered list will automatically append a number one to the first list item, a number two to the second list item and so forth. The unordered list does not assign a number, instead it places a dot (or bullet) to the left of each list item.
To create the unordered list we start by nesting inside the nav element and open and close a ul tag. If we were making an ordered list we would use ol in place of ul.
<nav>
    <ul>
    </ul>
</nav>
Inside the the ul tags we need to place a list item, the li tag.
<nav>
    <ul>
         <li></li>
    </ul>
</nav>
Nested inside the li tags we place our anchor tags and nested inside the anchor tags we place our text that we want our navigation menu to display.
<nav>
    <ul>
        <li><a href="#">Home page</a></li>
     </ul>
</nav>
Articles, Asides and Footers
We have three more sections to our web page, the sidebar, the main content and the footer.
Sidebar
The sidebar is nested inside three div elements, we start our sidebar with the “aside” tag. This is another element that was introduced in HTML5. Prior to the 5th version of HTML if you wanted a sidebar you would just use another div tag. The aside element gives more meaning than a div tag and is meant to say that anything inside the aside element is somewhat related to the main body content.
Main Content
The main content uses the article element. Much like aside, this element replaced a div tag and has more meaning than a plain old div tag. The article tag is meant to say that anything inside of this tag is part of the main article of the page.
Footer
The footer tag is pretty self explanatory, it goes at the footer of your content. Notice I did not say it goes at the footer of your page (although you can and should place one there). The header and footer can also go at the top and bottom of your aside and article tags respectively. I have them placed in only one spot each just to help keep things simple for now.
Finishing up
Comments
I’m sure you have noticed at the end of some of the div tags there is some strange type like so:
<!– .col-md-8 –>
These are comment tags. Comment tags are ignored by the browser and are very useful to developers. They can help you keep track of where your tags end, especially if you are nesting several elements. They can also help you debug your code. If you are having problems with a block of code you could comment it out instead of deleting it.
Comments, like other elements, have an opening and closing tag, you start with the less than bracket “<” add an exclamation point and two dashes. The closing tag is two dashes and the greater than symbol “>”. Anything in between the comment opening and closing tag will be ignored by the browser. Everything outside of the comment tag will execute like normal.
<!-- This is the
     Opening of the
      comment tag.
      This is the closing
      comment tag.
-->
Saving the code
If you have finished typing up all of the code you will need to save it as an html document, then open up the page in a browser. It does not look anything like the image at the top of this page. So what gives? Well the HTML is mostly structure, kind of like the bones. It is kind of ugly because it does not have a decorative skin just yet. With just a little bit of CSS we can make everything look nice and we can make the page match exactly like our image.
-
Previous:
-
Next: