First Steps with HTML 5
Learning the Basics
In this HTML 5 Beginner tutorial we take you from absolute beginner and show you step by step how to make your very first webpage from scratch. All you will need is a computer with a plain text editor and that’s it.
In this series we are going to show you how to create a webpage on your laptop PC or mac which will allow you to see the webpage on your own browser but will not be available on the internet. This is known as developing locally.
Developing your webpage locally allows you to save time and money since there are extra steps you need to take to get your website or webpage live on a server and most hosting accounts will typically charge a fee.
In a more advanced tutorials we will show you how to move your webpage or website onto a server where you will need a domain name and a hosting account. You wont need them just yet as there is a lot of material to cover first. When you are ready we ask that you please consider purchasing your domain name or purchase a hosting account from our affiliate partner. Though not required to take this course, making a purchase from our affiliate helps keep these lessons free of charge.
First steps
In order to understand how to build your first webpage we will need to:
- Create a folder to organize the files
- Create a new blank text document
- Convert the text document to a HTML file
- Open the newly created HTML file in a web browser
- Make edits through a text editor and view the results in a browser.
Make a new folder
To keep ourselves organized we first need to make a folder to place our files in.
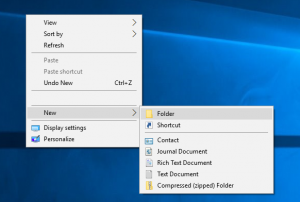
If you are on windows you can just right click anywhere on the desktop then click New > Folder.
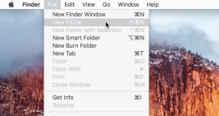
If you are on a mac, click the desktop or open a new finder window then click on File > New Folder.
You can name the folder whatever you would like for this tutorial I will name it “My First Web page”.
Make a Plain Text Document
Next we will need to open the folder and create a new text document. If you are using windows Right click anywhere inside the folder and click New>Text Document. If you are on a mac you can use the built in text editor “TextEdit” but you will need to set up a few settings to make it compatible for writing HTML. Check out How to Use TextEdit Plain Text Mode to learn how to set it up.
Convert the plain text document to a HTML document
In order for our file to be readable by a web browser we must change it from a text document to a HTML document. Doing so is simple, open your text document and select File > Save As.
In the dialog box that opens look for where it says “File name”, in that box you will see the file name followed by a period then the file extension. You will want to change the file name to index and the file extension to html. Once that is done click save. The file should now have the icon of a your default browser and the name should be index.html. If your file does not have a browser icon and still looks like a text document, double check the file name and make sure you have changed the extension from txt to html.
Now that you have converted your file from a text document to a html document you can double click on index.html, a browser window will open up and display a blank web page. A blank web page isn’t very exciting so next we will look at adding content to it.
Make edits and view the results
To make edits to our newly created webpage we will need to open it up in a plain text editor. Fire up your favorite plain text editor such as Note Pad or TextEdit, just make sure it has no built in formatting like Microsoft Word. Click on File>Open, navigate to the folder where you saved index.html, select index.html then click open. This will open up the HTML file in the editor, from here you can start adding in your code. Since you are following along with this tutorial I will assume that you don’t know any code. For now just type up a few paragraphs or you can grab some place holder text from loremipsum.com then copy and paste in your paragraphs. Once you are done making your edits go to File>Save to save your document. Now that you have saved your changes double click on index.html to open the file up in a browser. You will now see the paragraphs you typed in your browser window. As you can see it is quite simple to make a single webpage but that is not all there is to it, we have not covered how to write code just yet.
On to the next tutorial
By now you should have a firm understanding on how to make a HTML file from a plain text document. You know how to edit your HTML document, save the changes and view the results in a web browser. In the next tutorial “Anatomy of HTML tags” I will cover the basics of how to write HTML5.